How to Test Garden Soil pH in 10 Steps
Testing your garden soil pH can feel overwhelming if you’re not sure where to start. You’re not alone—many gardeners struggle to understand their soil’s acidity or alkalinity and how it affects plant health.
Getting it right is key to growing vibrant, thriving plants, so having the right tools is essential.
Test your garden soil pH by gathering a pH meter, test strips, or kit, then collecting several soil samples from healthy, representative spots in your garden.
Remove debris, mix the samples, and follow the kit directions with distilled water.
Compare the result to the pH scale, since most plants prefer slightly acidic to neutral soil.
If needed, add lime to raise pH or sulfur to lower it, then retest in a few weeks to fine-tune your garden’s growth and overall plant health.
Key Takeaways
- Soil pH affects nutrient availability and plant health, so testing helps prevent weak growth, yellowing, and low yields.
- Gather a pH meter, test strips, or kit, plus a clean trowel, bucket, and sample container.
- Collect representative soil from the root zone by mixing subsamples from similar garden areas. Avoid debris or contamination to get accurate results.
- Follow kit directions carefully, compare your results to the pH chart, and record readings for future reference.
- Adjust pH gradually with lime or sulfur. Then retest after a few weeks to confirm improvement.
What Soil pH Means for Your Garden
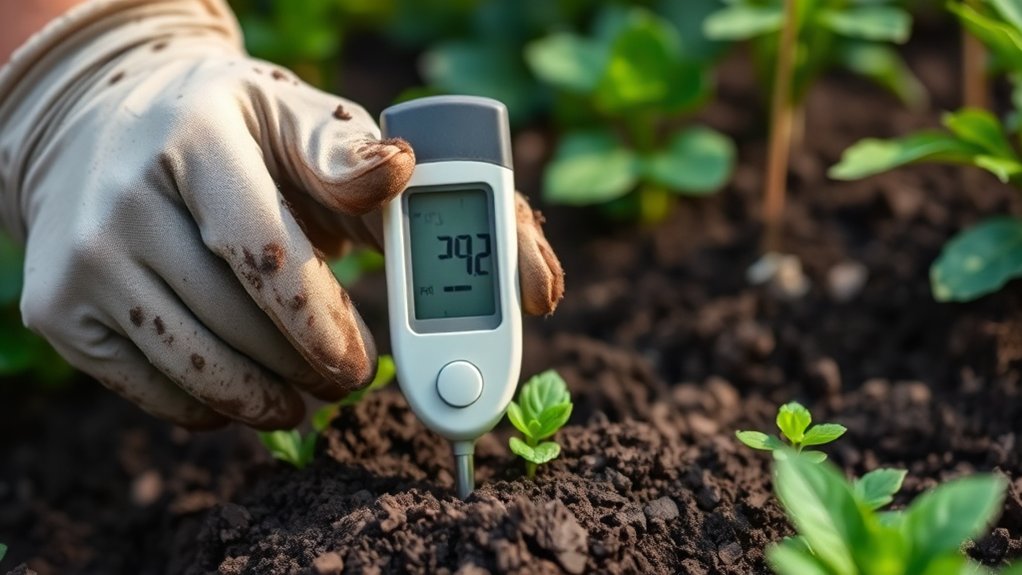
Soil pH shapes how well your garden can access nutrients, and it can make the difference between thriving plants and struggling ones. You measure pH on a scale from 0 to 14, with 7 as neutral. Numbers below 7 mean acidic soil, and numbers above 7 mean alkaline soil.
This balance matters because pH affects nutrient availability, so roots may absorb some minerals easily while others stay locked away. If the pH is too far off for your crops, you’ll often see weak growth, yellow leaves, poor flowering, or low yields.
Different plants prefer different ranges, so your tomatoes, blueberries, and lawns won’t all want the same conditions. When you understand your soil’s pH, you can better support plant health and choose the right plants for your garden.
Different plants thrive in different pH ranges, so knowing your soil helps you choose what will grow best.
That knowledge helps you avoid guesswork and gives you a clearer path to stronger, more productive growth over the season.
Gather Soil pH Testing Supplies

Before you test your garden soil pH, you’ll want to gather a few essential tools. Think of things like a pH meter, test strips, or a soil test kit—whatever works best for you.
It’s also a good idea to grab a clean trowel, a small bucket, and a sample container. These will help you collect soil from different spots in your garden.
Once you have all the right supplies ready, you’ll be set to get accurate results. From there, making smarter garden choices becomes a whole lot easier!
Essential Testing Tools
To test your garden soil pH accurately, you’ll need a few basic supplies: a reliable pH test kit or digital meter, a clean trowel or spade, a bucket for mixing samples, and a container or bag to hold the soil. Choose tools that match your pH importance, since accurate readings help you adjust nutrients and plant health with confidence.
Check your testing frequency based on crop needs and seasonal changes, then keep your kit handy for repeat checks. A simple color chart works for quick estimates, while a digital meter gives more precise results if you calibrate it properly.
Keep your tools clean, dry, and easy to reach so you can test whenever conditions call for it.
Sample Collection Supplies
Along with your pH kit or meter, gather the basics for collecting clean samples: a small trowel or spade, a clean bucket, a soil probe if you have one, and labeled containers or sealable bags. These tools help you compare sample types from beds, borders, and problem spots without contamination.
Keep your gear free of fertilizer dust, rust, or soap residue, because even small traces can skew results. Use simple collection techniques: scrape away mulch, take thin slices from several spots, and mix them in the bucket before testing.
- Sample at the same depth.
- Avoid wet or freshly amended soil.
- Label each bag with location and date.
Good supplies make your pH reading more accurate and easier to trust.
Take Samples From the Right Spots

Pick spots that best represent your garden area so your pH reading reflects the whole bed. Try not to sample from edges, walkway borders, or odd patches because they might skew the results. Instead, gather small amounts from several even spots and combine them into one test sample. This way, you’ll get a more accurate picture of your soil’s condition.
Choose Representative Garden Areas
Before you test, walk your garden and choose spots that reflect the area as a whole, not just one patch. Focus on areas with similar sunlight, plant growth, and watering so your sample shows real soil diversity.
If you garden in sections, test each one separately and match your testing frequency to how often you amend or fertilize. To stay organized, gather samples from:
- the vegetable bed
- the flower border
- the lawn or orchard strip
Mix the subsamples from each area in a clean container, then assess that blend. This gives you a reliable pH reading for each zone and helps you make better soil adjustments without guessing.
Avoid Edges And Patches
Skip the edges, paths, compost piles, and visibly odd patches, since those spots can skew your pH reading. When you do soil sampling, stay in the main growing zone where your plants actually feed.
Edges often show edge effects from runoff, shade, traffic, mulch, or neighboring beds, so they don’t reflect the average soil conditions. Move a few feet inside each area and take multiple cores from spots that look healthy and typical.
If one section seems different because of drainage, past amendments, or plant stress, sample it separately instead of mixing it with the rest. By avoiding outliers, you’ll get a truer pH result and make smarter liming or fertilizer decisions for your garden.
Prepare Soil for Testing
Start by clearing away leaves, mulch, rocks, and other surface debris so you can reach the soil you actually want to test. Then loosen the top inch with a clean trowel and remove any obvious roots or clumps. Good soil preparation helps you collect a more representative sample, which improves the testing benefits you get from the results.
Mix soil from several spots in the same bed, but keep them in the same growing area so you don’t blend unlike conditions.
- Sample only from the root zone.
- Break up compacted soil gently.
- Use clean tools and a clean container.
Let the mixed soil dry a little if it’s wet, but don’t bake it or expose it to fertilizer spillover. You want the sample to reflect your garden’s normal conditions, not a temporary change. After that, you’re ready to move on to the actual pH test.
Test Garden Soil pH With a Kit
With your soil sample ready, you can test garden soil pH with a kit in just a few minutes. Open the kit, read the instructions, and place the recommended amount of soil into the test chamber.
Add the supplied solution or tablet, then wait for the color to develop. Compare the result to the chart, and record the number for your garden plan.
| Kit Step | What You Do |
|---|---|
| Measure soil | Use the amount the kit specifies |
| Add reagent | Mix in the liquid or tablet |
| Wait | Let the sample react fully |
| Match color | Compare against the chart |
| Note pH | Write down the reading |
This simple pH testing method helps you spot whether your soil is acidic, neutral, or alkaline. Once you know the result, you can choose the right soil amendments for healthier plants and better growth.
Try a DIY Soil pH Test at Home
If you don’t have a kit on hand, you can still get a rough idea of your soil pH with a simple DIY test at home. Mix a small sample of soil with distilled water in two clean containers, then add vinegar to one and baking soda to the other.
You’ll notice a reaction if your soil leans acidic or alkaline, which helps you decide whether your garden may need attention. This quick check won’t replace a full lab test, but it can guide your next steps and protect soil nutrients from being locked up by the wrong pH.
Use the same method on different spots in your garden for a better picture, and keep your testing frequency consistent through the season.
- Collect soil from 4-6 inches deep.
- Use clean tools and distilled water.
- Record each result for future comparisons.
Check Your Results Against the pH Scale
Once you’ve seen how your soil reacts, compare the result to the pH scale to understand what it means for your garden. The scale runs from 0 to 14, with 7 marking neutral soil. Numbers below 7 show increasing soil acidity, while numbers above 7 show lower acidity and more alkalinity.
Match your test color or reading to the closest point on the chart, then note whether it falls in the acidic, neutral, or alkaline range. If you used a kit, follow its pH indicators carefully, since different brands can shade slightly differently. Keep your results with the date and test spot so you can track changes over time.
If the reading looks unclear, repeat the test with a fresh sample and clean tools. Small differences matter, so aim for the nearest half point when possible. This quick comparison gives you a reliable baseline for future soil checks and helps you read your garden conditions with confidence.
What Soil pH Means for Plants
Soil pH affects how well your plants can absorb nutrients, which means it plays a direct role in their growth, color, and overall health. When you understand this number, you can read your garden’s needs more clearly. Most plants do best in a slightly acidic to neutral range because that’s where nutrient availability stays balanced and roots can take up what they need.
Soil pH shapes nutrient uptake, helping plants grow stronger, greener, and healthier in the right range.
- Low pH can limit calcium, magnesium, and phosphorus.
- High pH can make iron, manganese, and zinc harder to use.
- A pH that fits your crop supports steady plant health and stronger growth.
You don’t need to guess why leaves look pale, why growth slows, or why flowers seem weak. Soil pH often explains those clues. By matching plants to the right pH range, you give them a better chance to thrive, and you reduce stress before it starts.
Adjust Soil pH Safely if Needed
If you find that your soil pH needs adjusting, go for safe amendments like lime or sulfur depending on what your test shows. It’s best to start with small changes so you don’t shock your plants or go too far. After a few weeks, check the soil pH again to see how it’s responding. This way, you can make sure you’re on the right track without any surprises.
Choose Safe Amendments
To adjust garden soil pH safely, start with the gentlest amendment that matches your test results: add garden lime to raise pH, or elemental sulfur to lower it. Choose products that suit your beds and won’t shock roots.
Organic amendments like compost, leaf mold, and manure help as pH buffers while improving structure. You can also use natural fertilizers and soil conditioners that support steady growth without abrupt swings.
Consider these compost options:
- Finished compost
- Worm castings
- Aged manure
Read labels carefully and match the amendment to your crop needs. Avoid guesswork, and use materials that release slowly, so your soil stays balanced and productive over time.
Apply Small Adjustments
Once you’ve picked a safe amendment, apply it in small, measured amounts and retest before adding more. Spread lime, sulfur, or another choice evenly over the soil surface, then work it lightly into the top layer if the product instructions allow.
Use the label rate as your limit, and don’t guess at heavier doses. Different soil amendment options work at different speeds, so patience matters.
If you’re lowering pH, choose pH adjustment techniques that suit your soil type and climate. Sandy soil changes faster than clay, so keep your changes modest.
Water the area after application to help the amendment start working, but avoid soaking the bed. Small steps protect roots, reduce shock, and give you better control over the final result.
Recheck Soil pH
After you’ve made an adjustment, wait the recommended amount of time and then recheck the soil pH with the same testing method you used before. This repeat test shows whether your soil amendments worked or if you need another small correction.
Keep your testing frequency steady so you can track change without overreacting to one reading. If the pH still sits outside your target range, adjust again in modest steps, not all at once.
- Retest in the same spot.
- Compare results with your goal range.
- Make only one change at a time.
That careful approach protects roots, reduces waste, and helps you keep your garden soil balanced for healthy growth.
Retest Soil pH After Changes
Now that you’ve added lime, sulfur, or other amendments, retest the soil pH to see if your changes worked. Wait the recommended interval for the product you used, then sample the same spots again so you can compare results accurately.
Keep your retesting frequency steady. Many gardeners check every few weeks after a major adjustment, then move to monthly or seasonal checks once the soil stabilizes. Also, account for seasonal variations since rain, irrigation, and temperature can shift pH over time.
If the reading still misses your target, apply small corrections instead of making a big change all at once. Mix amendments evenly into the root zone, water the area, and retest later.
Record each result, along with dates and treatments, so you can spot patterns and avoid overcorrecting. With careful follow-up, you’ll keep your soil in the range your plants need and support healthier growth all season.
Frequently Asked Questions
Can Rainwater Affect My Soil pH Test Results?
Yes, rainwater can affect your soil pH test results, especially if you’ve recently had heavy rain. Rainwater chemistry often leans slightly acidic, so it can temporarily shift surface soil acidity and make your reading lower than usual.
You’ll get a more reliable result if you test when the soil’s moist but not saturated. Wait a day or two after rainfall, then sample several spots for a better average reading.
How Often Should I Test Different Garden Areas?
You’d think one soil test could rule your whole garden, but nature loves surprises. For most beds, you should test each area every 2–3 years. Problem spots or pH variation zones need yearly checks.
If you add compost, lime, or sulfur, retest sooner. Your soil testing frequency should rise after heavy rain, new plantings, or poor growth. By sampling each distinct area, you’ll catch changes before they sabotage your harvest.
Does Compost Change Soil pH Over Time?
Yes, compost can change your soil pH over time, but usually only a little. You’ll often see compost effects that buffer extreme acidity or alkalinity, helping improve soil health overall.
If you add compost regularly, you may notice gradual shifts as microbes break it down. You shouldn’t expect dramatic pH swings, though.
Test your soil occasionally, and you’ll know whether your compost is helping or if you need to adjust amendments.
Can Potting Soil Be Tested the Same Way?
Yes, you can test potting soil the same way, but it’s like reading a different map with the same compass. You’ll get better results if you first check the potting soil composition, because peat, bark, perlite, and compost can shift readings.
Use the same testing methods you’d use for garden soil, but mix the sample well, add distilled water, and follow the kit directions closely for a reliable pH result.
What if My Soil Test Kit Is Expired?
If your soil test kit is expired, you shouldn’t trust the results. You might still get a rough idea, but the chemicals can weaken and skew readings.
Replace it with fresh expired kits only if you want a quick backup, not a final answer. Try alternative methods like a digital pH meter, lab analysis, or a simple vinegar and baking soda test.
You’ll get more reliable results and avoid guessing about your soil.
Conclusion
Testing your garden soil pH is like checking the compass before a road trip. You want to know you’re headed the right way. One gardener found her tomatoes struggling until a simple test showed the soil was too acidic.
After a small lime adjustment, the harvest bounced back. When you understand your soil, you can give each plant the conditions it needs to thrive. Test, adjust, and retest, and you’ll grow with confidence testing your garden soil pH.